


Thursday, September 12, 2013
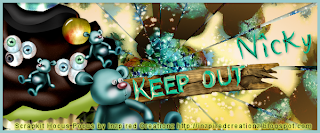
Keep Out

This tutorial was written
by Sarah Fiack on
September 12th, 2013
Any resemblance to another
tutorial is purely coincidental.
I am using the PTU scrap
Hocus Pocus by Inzpired Creationz
available at PMTWS
Plugins Xero: Bad Dream
Xero Soft Vignette
VM Distortion Broken Mirror
Open a 600x250 new image.
Open up your scrap supplies of choice.
Click your new image with your magic
wand tool. Paste a paper of choice
as a new layer. Selections invert
& press delete.
Paste your cupcake of choice
as a new layer. Position as wanted
on the tag. I moved mine to the left
side of the tag. Press delete.
Open a teddy bear element.
Resize 50%. Paste as new layer
by the cupcake element.
Select none.
Add a drop shadow to the cupcake
and bear layers. 2,2,50,5 black.
Open a wooden sign. Resize 70%
or as needed. paste to right side
& slightly behind the previous
element layers. You want it sticking out
from the cupcake and bear.
Duplicate the paper layer once.
Make sure the duplicate layer is selected
in your layer palette. Apply the plugin
Xero: Bad Dream default settings
Now apply the plugin Xero
Soft Vignette
Gradient shape Elliptical
Effect type foreground colour
Pattern type Solid
Repeats width Height all 0
Strength 255
On the same duplicate layer,
apply VM Distortion Broken Mirror
default settings.
Add the earlier drop shadow to the layer.
Merge layers. Add a new raster layer.
Fill with a color of choice from your tag.
Click this layer with your magic wand tool.
Selections modify contract by 5.
Press delete button. Ta da instant border.
Select none.
Add a drop shadow to the layer.
To make the avatar:
Open a 150x200 ( or desired size ) new image.
Click this image with your magic wand.
Copy your merged layer & paste onto your
avatar as a new layer. Selections invert
& press delete.Select none.
Move the bottom layer to the top
in your layer palette. Fill with a color
of choice - I used same color for border
of tag.
Click the layer with magic wand tool.
Selections modify contract by 5.
Press delete.
Select none.
Bingo you have an avatar.Make sure
to add a drop shadow.
Add copyright information &
name to both. Save as png.
Thanks for trying my tutorial.
Subscribe to:
Post Comments
(Atom)
My Store

Zone Award

0 comments:
Post a Comment